By: Dmitry Me.
15 FEB 2016
4402
With the release of the latest models of Android Wear and Android updates, Wear devices are becoming increasingly independent. They have their own specific apps and features, so their relationship with mobile devices is weakening. You only have to connect your Wear device to your mobile via Bluetooth once, and you will be able to make full use of your gadget.
Moreover, with the latest Android models and versions, you don’t even need to be near the Bluetooth device to which your watch is attached. Wi-Fi can connect directly with the Wear device.
Wearable Data Layer
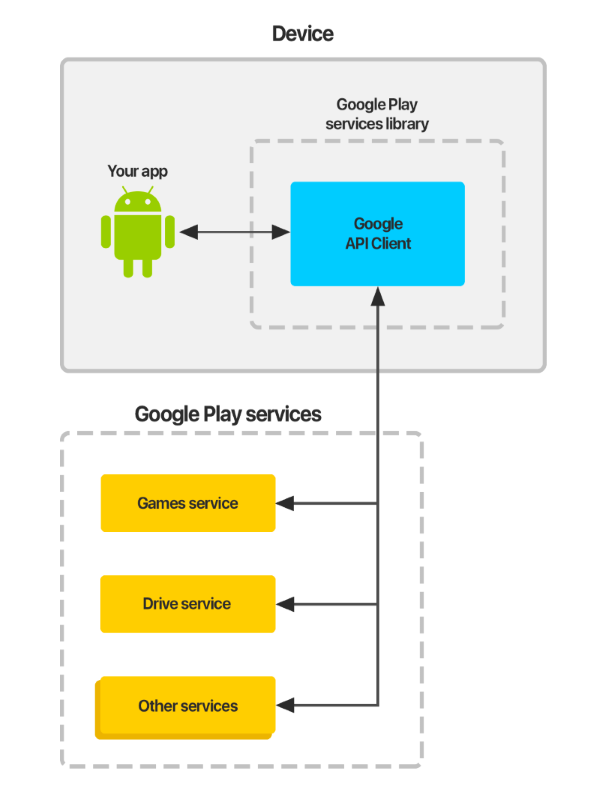
This is possible because of the so-called Wearable Data Layer, which is a channel between wearable and handled applications. Google Play Services facilitate the sending of messages or any other data as well as the synchronization of important events.
The principle of Google Play Services
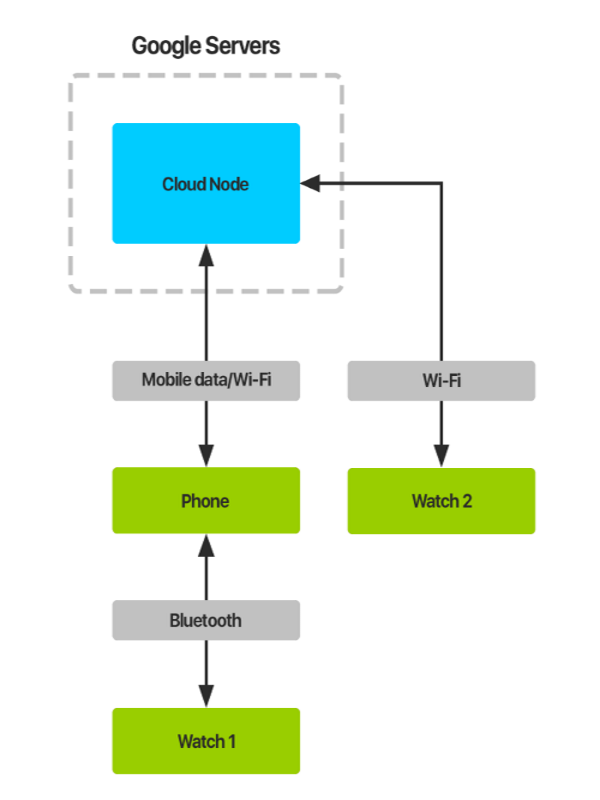
In addition, you can sync multiple Wearable devices with the handled device. The information from your watch or mobile application is sent to the cloud and is updated on connected devices via Google Play Services.
The principle of sync between watch and device
As seen in the scheme, the information on a watch can be delivered directly via Wi-Fi, but it doesn’t have direct access to the Internet. All actions related to the Internet will have to be performed in a similar way, by sending all requests to your mobile or tablet, using the Wearable Data Layer. This device will "talk" to the Internet and all necessary services, and then send a response back to the watch.
Using the Wearable Layer
To use the Wearable Data Layer API you need to create an instance of GoogleApiClient class. It has the builder to create a client. To synchronize data, use DataItem. After sending the information in this way, the data will be automatically synchronized with all connected devices.
Example:
GoogleApiClient mGoogleApiClient = new GoogleApiClient.Builder(this)
.addConnectionCallbacks(new ConnectionCallbacks() {
   @Override
   public void onConnected(Bundle connectionHint) {
      Log.d(TAG, "onConnected: " + connectionHint);
      // Now you can use the Data Layer API
      }
   @Override
   public void onConnectionSuspended(int cause) {
      Log.d(TAG, "onConnectionSuspended: " + cause);
      }
   })
.addOnConnectionFailedListener(new OnConnectionFailedListener() {
   @Override
   public void onConnectionFailed(ConnectionResult result) {
      Log.d(TAG, "onConnectionFailed: " + result);
      }
    })
// Request access only to the Wearable API
.addApi(Wearable.API) .build();
To synchronize data, use DataItem. After sending the information with its help, the data will be automatically synchronized with all connected devices.
Example:
PutDataMapRequest putDataMapReq = PutDataMapRequest.create(UNIQUE_PATH);
putDataMapReq.getDataMap().putInt(KEY_FOR_DATA, DATA);
PutDataRequest putDataReq = putDataMapReq.asPutDataRequest();
PendingResult pendingResult =
Wearable.DataApi.putDataItem(mGoogleApiClient, putDataReq);
UNIQUE_PATH - unique path for data storage. It must begin with a "/";
KEY_FOR_DATA - key for which the data are available;
DATA - the data.
You can synchronize all types of data. Also, you can send data simply as a byte array.
For trapping messages to your client (GoogleApiClient) you need to bind the listener that receives events about any changes. It is better to do this after a successful connection.
Example:
@Override
public void onConnected(Bundle bundle) {
   Wearable.DataApi.addListener(mGoogleApiClient, DataApi.DataListener);
   }
Then the Data Api.Data Listener.onDataChanged method will receive events about changes.
Example:
@Override
public void onDataChanged(DataEventBuffer dataEvents) {
   for (DataEvent event : dataEvents) {
      if (event.getType() == DataEvent.TYPE_CHANGED) {
         // DataItem changed
         DataItem item = event.getDataItem();
         if (item.getUri().getPath().compareTo(UNIQUE_PATH) == 0) {
            DataMap dataMap = DataMapItem.fromDataItem(item).getDataMap();
            Int value = dataMap.getInt(KEY_FOR_DATA);
            }
         }
      else if (event.getType() == DataEvent.TYPE_DELETED) {
         // DataItem deleted
         }
      }
After event triggering, you will need to ensure that the changes are coming on the desired path. Then it will be possible to get them using the key.
If the watch is turned off or the connection is broken, all of the information about the changes is saved, and data will be delivered after the connection is restored.
To send large amounts of data, such as pictures, you can use Assets. This also works with Data Item.
Example:
private static Asset createAssetFromBitmap(Bitmap bitmap) {
   final ByteArrayOutputStream byteStream = new ByteArrayOutputStream();
   bitmap.compress(Bitmap.CompressFormat.PNG, 100, byteStream);
   return Asset.createFromBytes(byteStream.toByteArray());
   }
Bitmap bitmap = BitmapFactory.decodeResource(getResources(), R.drawable.image);
Asset asset = createAssetFromBitmap(bitmap);
PutDataMapRequest dataMap = PutDataMapRequest.create("/image");
dataMap.getDataMap().putAsset("profileImage", asset)
PutDataRequest request = dataMap.asPutDataRequest();
PendingResult pendingResult = Wearable.DataApi.putDataItem(mGoogleApiClient, request);
Google recommends limiting transmitted data to 100kb. You can send more than 100kb, but it will affect the operability of your system. You have to test your system properly, to make sure that it receives the full scope of sent information (for volumes greater than 100kb).
In general, Google provides good opportunities for working with Android Wear. Reliable data delivery and synchronization make it pleasant work using similar gadgets. Using these features, you can easily set up any type of notifications. Using the Wearable as a screen, you can transfer data logic to your mobile; the watch will simply display the information. This is very convenient when working with notifications, messages and phone calls as it doesn’t require any effort during direct usage.
 Services
 Work
Work
 Company
 Blog
Blog
 Contact


